

How to Draw Multiple Axis in Matplotlib with different Scales (Value Range)
I was looking for a way to implement multiple scales in Matplotlib. Multiple scale means using different scales in the same y-axis for different line plots.
For example, if I have four columns in my dataframe named, x, y1, y2, and y3; I will plot y1, y2, and y3 against x in the same plot (no subplots), where all y1, y2, and y3 have different ranges.
The official Matplotlib gallery has a demo code for following example,
However, the code does not generate exactly the same as depicted. It misses the second (Temparature, in this example) y axis. There fore, I had to tweak a little to fix the issue. Therefore I added the following code for fixing the second scale.
new_fixed_axis = par1.get_grid_helper().new_fixed_axis
par1.axis["right"] = new_fixed_axis(loc="right", axes=par1,
                                        offset=(offset-60, 0))

par1.axis["right"].toggle(all=True)
Now, if you want to create something like this plot from the data you have in an excel file or a CSV file, the whole code should look like as follows:
import matplotlib.pyplot as plt
import pandas as pd

df = pd.read_excel("testfile.xlsx", engine='openpyxl')
# df = pd.read_csv("text.csv")

x = df["column_x"].tolist()

y_1 = df["column_y1"].tolist()
y_2 = df["column_y2"].tolist()
y_3 = df["column_y3"].tolist()

host = host_subplot(111, axes_class=AA.Axes)
plt.subplots_adjust(right=0.85)

par1 = host.twinx()
par2 = host.twinx()

offset = 50

new_fixed_axis = par1.get_grid_helper().new_fixed_axis
par1.axis["right"] = new_fixed_axis(loc="right", axes=par1,
                                        offset=(offset-50, 0))

par1.axis["right"].toggle(all=True)

new_fixed_axis = par2.get_grid_helper().new_fixed_axis
par2.axis["right"] = new_fixed_axis(loc="right", axes=par2,
                                        offset=(offset, 0))

par2.axis["right"].toggle(all=True)

host.set_xlim(0, 150)
host.set_ylim(-5080, -5000)

host.set_xlabel('x_label')
host.set_ylabel('y1 scale label')
par1.set_ylabel('y2 scale label')
par2.set_ylabel('y3 scale label')

# or you can put labels like following, both works fine
p1, = host.plot(x, y_1, label='Total Energy, E(ev)', marker='x')
p2, = par1.plot(x, y_2, label='Total Energy per atom (ev/atom)', marker='^')
p3, = par2.plot(x, y_3, label="E-E_best (ev/atom)", marker='o')

par1.set_ylim(-844, -830)
par2.set_ylim(0, 0.20)

host.legend()

host.axis["left"].label.set_color(p1.get_color())
par1.axis["right"].label.set_color(p2.get_color())
par2.axis["right"].label.set_color(p3.get_color())

plt.draw()
plt.show()
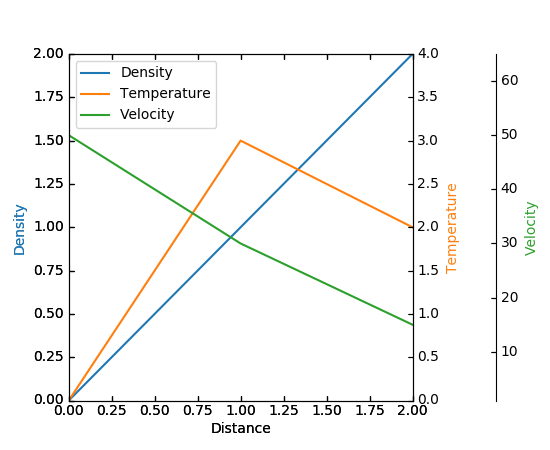
I have found another useful code (2nd best) in this Stackoverflow Thread. You can use that simpler version either. I am adding my personally modified version here,
import matplotlib.pyplot as plt
import pandas as pd

df = pd.read_excel("testfile.xlsx", engine='openpyxl')
# df = pd.read_csv("text.csv")

x = df["column_x"].tolist()

y_1 = df["column_y1"].tolist()
y_2 = df["column_y2"].tolist()
y_3 = df["column_y3"].tolist()

fig, host = plt.subplots(figsize=(8,5)) # (width, height) in inches

par1 = host.twinx()
par2 = host.twinx()

host.set_xlim(0, 150)
host.set_ylim(-5080, -5000)
par1.set_ylim(-844, -830)
par2.set_ylim(0, 0.20)

host.set_xlabel('x_label')
host.set_ylabel('y1 scale label')
par1.set_ylabel('y2 scale label')
par2.set_ylabel('y3 scale label')

color1 = plt.cm.viridis(0)
color2 = plt.cm.viridis(0.5)
color3 = plt.cm.viridis(.9)

p1, = host.plot(x, y_1,    color=color1, label="Density", marker='x')
p2, = par1.plot(x, y_2,    color=color2, label="Temperature", marker='^')
p3, = par2.plot(x, y_3, color=color3, label="Velocity", marker='o')

lns = [p1, p2, p3]
host.legend(handles=lns, loc='best')

# right, left, top, bottom
par2.spines['right'].set_position(('outward', 60))

# no x-ticks
par2.xaxis.set_ticks([])

host.yaxis.label.set_color(p1.get_color())
par1.yaxis.label.set_color(p2.get_color())
par2.yaxis.label.set_color(p3.get_color())

# Adjust spacings w.r.t. figsize
fig.tight_layout()

plt.savefig("pyplot_multiple_y-axis.png", dpi=300)
That’s all for today. Cheers!

Leave a comment